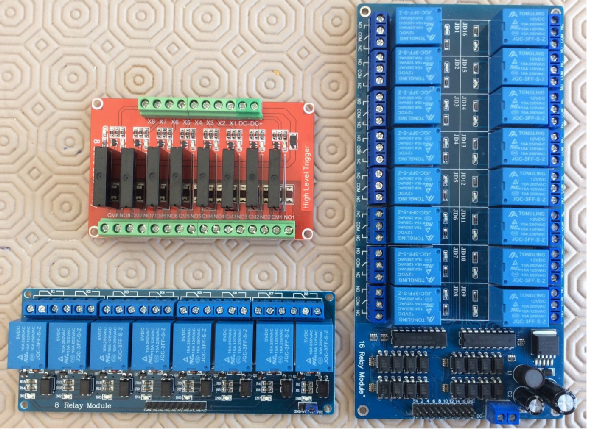
This review looks at the use of various multi-way relay modules for control of model railway accessories.

The aim of the test being to prove satisfactory operation of solenoid point motors using a Capacitor Discharge Unit (CDU) for more positive solenoid throw and a Hornby R8247 Point and Accessory Decoder (PAD) as the operational control device.

Three types of modules were reviewed in context:

8-way 12v operating Solid State Relay (SSR) module with hi-level triggering of an AC load.

8-way 5v/12v operating Mechanical Relay (MR) module with lo-level triggering of a DC load.

16-way 5v operating MR module with triggering of a DC load from an Arduino micro controller.


Introduction

Model railway accessories can be operated manually by way of hand switching or under Digital Command Control (DCC) using PADs such as the Hornby R8247 module as the interface.

It can be advantageous to be be able to combine the two methods, especially to operate solenoid point motors, as the use of DCC often limits the amount of ‘punch’ that can be applied to a solenoid point motor. Use of an external firing circuit can include a hefty CDU to more reliably operate the solenoids. Use of relays allows the DCC PAD to control the relay coil side of things with the external circuit being separately directed through the relay main contacts to the solenoids.

Relay Modules

The following three modules were tested:

8-way 12v operating Solid State Relay (SSR) module with hi-level triggering of an AC load. Fig.1 - Top left.


8-way 5v/12v operating Mechanical Relay (MR) module with lo-level triggering of a DC load. Fig.1 - Bottom left.


16-way 5v operating MR module designed for triggering by an Arduino micro controller. Fig.1 - Right.


Figure 1 - Relay Modules Tested


The basic generic wiring schematic used was this:
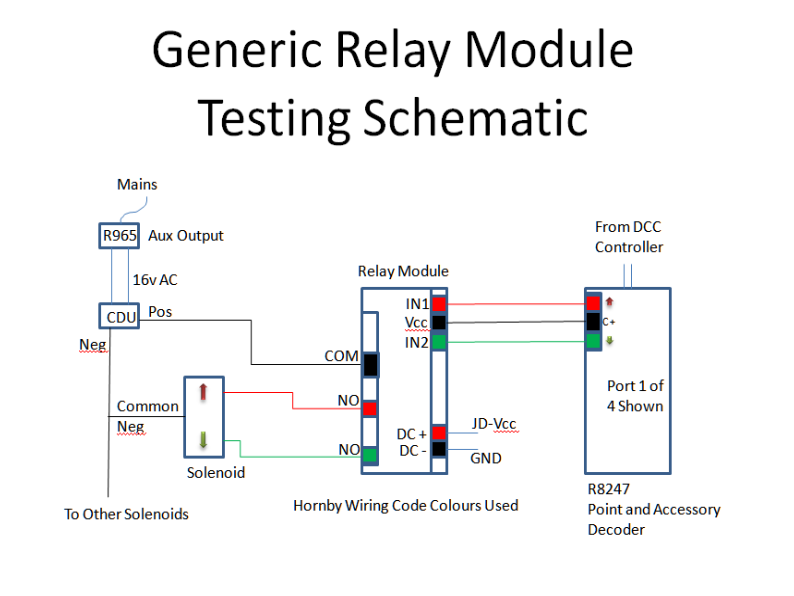


Figure 2  - Generic Wiring Schematic


General Notes:

1. Not all relay modules have separate JD-Vcc (module/relay power also seen as DC-In) and Vcc (trigger power) inputs. It is essential for long term reliability that these, if singular, match the PAD output voltage 12-14vDC. Those modules with separate module/relay coil and trigger supplies usually have the facility to jumper these together, such that one external supply can provide for both functions.

2. Some modules also have jumpers that allow trigger input logic (usually designated IN# or X#) to be switched to -Level or Hi-Level according to intended use.

3. Some SSR modules can be configured to operate either/both AC and DC loads. AC load only modules will have a 2-wire output from the relay (CM and NO) and dual load capable modules will have a 3-wire output (CM, NO and NC). Some modules can also have the trigger logic level switch Hi or Lo.


SSR Module

This typical 8-way SSR module is designed to handle AC loads only by way of a Hi-Level trigger. Module power is combined for both relay and trigger power at 5vDC. If a DC load is presented the relay will latch on even after the trigger is removed, until the module is either powered down completely or the load circuit is interrupted. The reason for this is that the internal switching circuitry requires a passing zero voltage to reset (turn off) the relay latch components, which is always present in a typical AC sine-wave-form. With a DC load this passing zero action can only be accomplished by interrupting the load circuit, taking away much of the reason for using a remote relay trigger in the first place.

This is the wiring circuit used for this module:
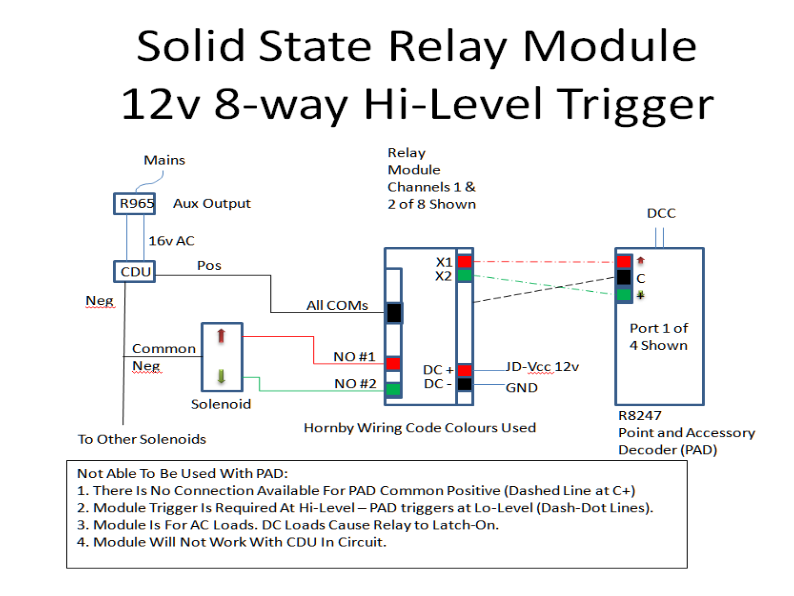


Figure 3 - SSR Relay Module Wiring Schematic


Initially the circuit was tested without the CDU or PAD in circuit. This was to prove the AC load functionality. DC IN + and – (JD-Vcc) were connected to a used 9v battery for the tests. The solenoid was connected direct to the Hornby R965 Controller Aux AC power output via the module relay terminals (CM1/2 and NO1/2) i.e. bypassing the CDU and providing an AC load.

A jumper cable was connected between DC IN + and then X1 and X2 in turn. The associated channel LED indicator lit and the solenoid snapped across. Whilst the jumper cable was held in place the solenoid continued to receive current. Removal of the jumper cable caused the relay to drop out. Normal operation of a solenoid is to provide it with a short burst of power only; else the solenoid coils will burn out. An external timing circuit could be used to connect-disconnect the firing signal, but this adds to the complexity of the wiring given that the diagram shows only one port of the module in use.

Next the CDU was brought into circuit as shown in the diagram, making the load DC and the test carried out again.

This time there was no response when the jumper cable was applied, however if the jumper was applied before the CDU was brought into circuit then the relay operated the solenoid upon the CDU reconnection. It is thought the charged CDU must affect the internal working of the SSR components.

Again to provide a manual break/make switch into the system defeats the object of the exercise.

The CDU was again removed from circuit and the PAD introduced. PAD provides a negative going pulse on the directional ports with a common positive, hence there was no simple way to configure the PAD to provide a Hi-Level (i.e. positive) pulse to the SSR triggers (X1-8). It is thought some form of charge-pump or other voltage inverting circuit could be used to provide a positive going pulse with a common negative, but this would require one such device for every PAD port output adding to the complexity of the project if used across an extensive layout with many points.

Summary

To make SSR modules work with PAD they need to be Lo-Level triggered, 12vDC operated, DC load capable and have separate inputs for DC IN, JD-Vcc and Vcc. Sourcing such a module was possible but they were disproportionately more expensive than the more common modules as tested.


5v 8-Way Electro-Mechanical Relay Module

This is the wiring circuit used for this module:
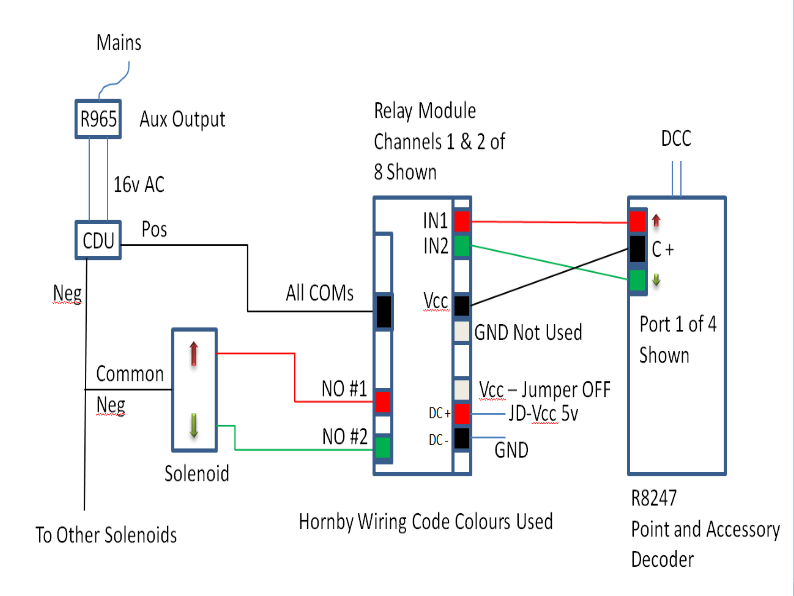


Figure 4 - 8-Way Relay Module Wiring Schematic


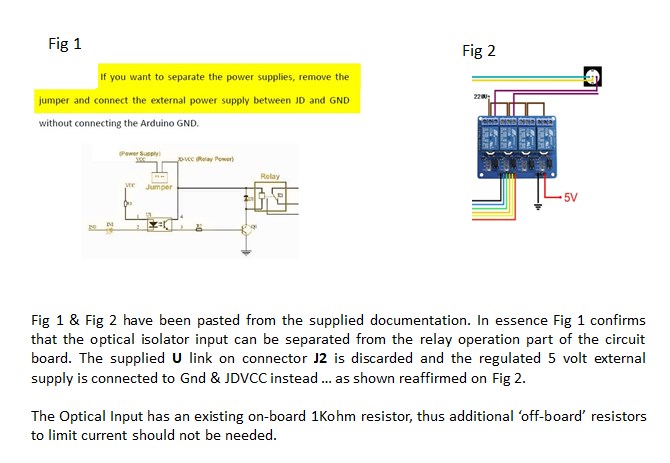
This 5v module has a jumper to connect or disconnect JD-Vcc with or from Vcc, the latter (disconnected) configuration allows the PAD C (positive) to be safely connected to the 5v relay module. The module is Lo-Level triggered, which is required for the PAD switching to work.

The following Additional Figures illustrate better how VCC (R8247) and JDvcc (external 5v PSU) are achieved.
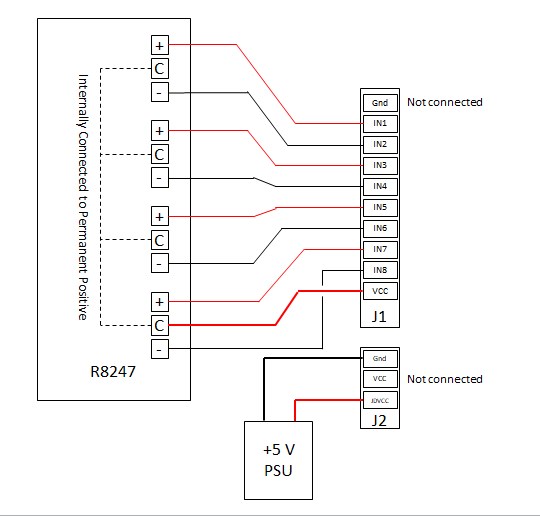


The module was tried with a CDU in and out of circuit and both configurations work.

Summary

The module works with a CDU in or out of circuit. NC contacts are available for use if required.

A disadvantage is having to provide a 5vDC IN power supply. The use of a 12vDC IN module would be better to avoid over-volting the relay coils, albeit for the task of firing solenoids they are only exposed to the PAD 14v pulse for around 100ms.


12v 16-Way Electro-Mechanical Relay Module

This is the wiring circuit used with this module:
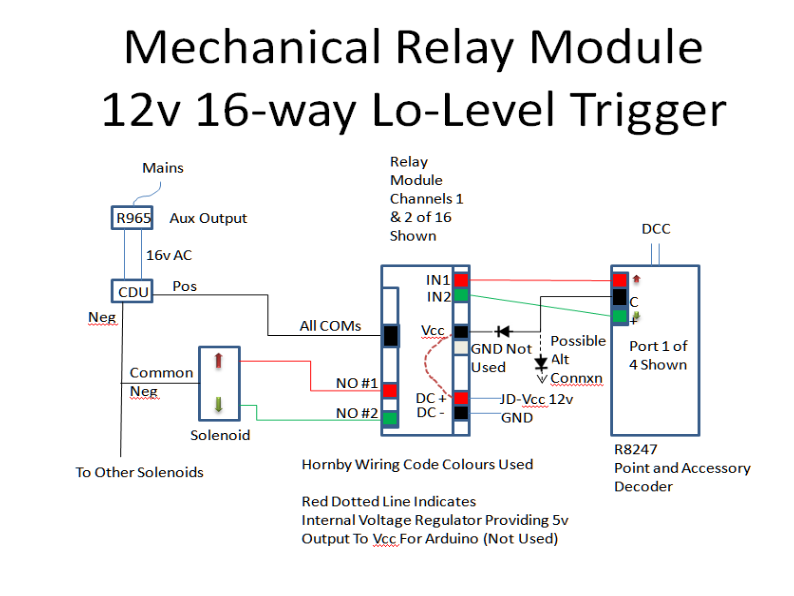


Figure 5 - 16-Way Relay module Wiring Schematic


This 12v module has a single 12v DC IN (+ and -) connection but no jumper like the previous module to split JD-Vcc and Vcc. Vcc is provided by an internal buck convertor. Vcc can be measured at 5v + on the dual row 16-DIP header, where it is intended for use to power an external Arduino device, which would then upon command of a pre-programmed ‘sketch’ send the Lo-Level triggers to trigger pins IN1 to IN16.

It is not known what effect a short 12-14vDC pulse from the PAD would have on the relay module components behind Vcc, hence it was thought advisable to insert a diode as shown in the schematic to protect the PAD from Vcc and slightly drop the voltage. The possible alternative connection shown in the schematic relates to integrating an existing manual switching system for the points to allow dual operation as required. Such system would obviously also need to Tee into the PAD directional switched negatives.

As the module manufacturer had not responded to queries about the effect of using a short 12-14vDC pulse against the Vcc components it was decided to proceed at risk. The circuit was enabled and worked as required. A negative switched command from the PAD to the input header pulled in the associated relay and the solenoid fired in each direction. The circuit worked with and without a CDU in circuit.

The module manufacturer finally responded about the use of 12-14v pulses as Vcc, but the advice was vague and indicated not to use a continuous 12vDC on the Vcc pin, with no advice about using a short pulse.


Summary

Whilst the module works fine as per the diagram with a PAD and CDU, it may benefit from further reliability testing with the PAD C positive also connected into the DC IN circuit to avoid the need for a separate supply and possibly using more than one diode to drop the pulse voltage into Vcc.


Overall Conclusion

A mechanical module is required that has 12vDC relay coils, a separate DC-In/Vcc facility with Lo-Level triggering.

A solid state relay module is required to be able to handle AC and DC loads, have Lo-Level triggering at 12vDC and have separate inputs for DC IN, JD-Vcc and Vcc.


RH-Relay-Modules-Oct-2020v1.3

V1.3 improves clarity with additional diagrams


Return To Product Review Index


Robs Rails My Railways Gallery Articles Info and Service Sheets DCC Downloads Teardown Reports Product Reviews Wiring Diagrams Contact Me Coming Next